Saturday, March 30, 2013

What Goes Up, Must Fall Down (DIY Stair Runner)

The stairs.

Those things are the bane of my existence, I tell ya.  It's been like putting lipstick on a pig.  And not fancy MAC lipstick, either.  More like iridescent, pink Wet N' Wild that's been sitting in a makeup drawer for thirteen years. 

It's been bad.

But lately, I've run into a non-cosmetic issue with those darn things.  The kids keep falling down 'em.
I asked Jack to re-enact his latest tumble:


He was all too happy to demonstrate.  Love that kid.

I've been fighting putting carpet on the stairs since we got them.  I've been convinced I could refinish them and make them awesome.  It's not working.  They look bad.  Real bad.  There are gaps everywhere and cracks in them.  And apparently, they're slippery.  I only put two coats of satin polycrylic on them after I stained them with the hopes that they wouldn't be too slick.  And they're not really all that slick, but for a 4 and 6-year-old wearing socks while chasing each other down the stairs, they spell D-A-N-G-E-R, Will Robinson.

So, I got to work.

I saw this runner makeover over at Little Green Notebook and used it as my inspiration.  I love the lines and color of this little rug from Ikea:

Ikea 'Soften' rug


I picked up four rugs during a recent trip to Ikea and jumped right in.

That wayward staple was removed.  Don't you worry.

I worked my way down, doing my best to stretch the carpet around the edge of the tread and staple it just underneath.  I found that if I stapled it on the white stripe, it was nearly invisible.

Don't do this.

Do this instead.

And at the end of the day, I was left with this:


Crazy, right?  Let's take a moment and go back in time (a few months ago) and look at what I started with:


And with the magic of the internets, I have this:

I took this photo while I was waiting for the paint to dry on the trim piece
 I placed at the bottom of the stairs to cover the end of the stair runner.


I especially love how the stripes look from this angle:


I still need to finish the trim paint on the faux stair skirt, and add a couple bits of trim, but those stairs have sure come a long way, baby.  I have no idea how the carpeting is going to wear.  And seriously, what was I thinking putting dark, charcoal fabric on stairs while we're still under construction?  They show every speck of dust.  But I'm still very, very happy with the end result.  I'll report back over the next few months and throw out an update.

Linking up to:


TDC Before and After

Monday, March 18, 2013

Thirty Minutes And Nine Bucks - Open Shelving Tutorial

Thirty minutes and nine dollars.  That's it.  That's all you need to build some functional open storage for your kitchen.  And probably to get a questionable massage in a questionable neighborhood.  But let's talk about shelves today.

We've officially opened up a can of whoop-ass on the kitchen and I'm not taking any prisoners.  My goal is high-end looks on a low, low, low, low budget.  In order to achieve that, I'm planning to DIY the ENTIRE thing.  I'm reducing, reusing and recycling, baby.  And that brings us to today's project, which has me particularly excited.


A little backstory for you:  We started this whole-house reno last August.  One of the first things that had to happen was gutting the pantry since that was going to be where the staircase went.  I still remember the morning that the builder told me I was going to have to clear it out.  I think I knew at that moment that things were going to get real up in here.


And then we tore the wall of cabinetry down in order to expand the kitchen.  So, everything in those cabinets got relegated to the basement, along with the contents of the pantry.


I spend about 85% of my time in the house in the kitchen on any given day.  From making coffee first thing in the morning, prepping lunches for everyone, fixing after-school snacks, all the way to making dinner and cleaning up the ridiculous messes that happen in here.

I love being in the kitchen.

I love cooking.

I even love cleaning it.

 I've been without a fully functional kitchen for about EIGHT months.  Eight months of feeling sad every time I came into the kitchen to prepare a meal.  Eight months of barking at the kids to not touch certain boxes of construction-related material that were all over the place.  Eight months of not being able to find the things I need because I seriously had no idea where they had been packed.  EIGHT MONTHS.  That translates to about 240 days.  Two hundred forty days of feeling lost in this house.  

Now, I know it sounds dramatic and granted, I wasn't going to fling myself off of the Ambassador Bridge or anything.  But I'm willing to bet that anyone who has ever gone through a big renovation like this can relate.  Heck, even people who've only done their kitchens will tell you how horrible it was.  But the last 240 days in this kitchen.... they've been.... not awesome.

And every single one of those days, I thought about how I was going to make this kitchen awesome.  I've collected so many clippings of kitchens and one thing that has always stood out was a touch of open storage.  Just a touch.  Not too much.  I don't like visible clutter (It makes me itch.  Ask John) and if I was going to go the shelf route, it needed to be neat and tidy.

And cheap.

Let's get started, shall we?

I began by scooping up four of these lovely lads:


Source: ikea.com via Carol on Pinterest


Then, I found a few cabinet doors from the demolition phase of the kitchen and asked John, very nicely, if he would rip them down to a shelf-ish dimension of about 26"x10".


The boards were in super-pretty shape.  Super-pretty.


I simply glued the boards together and clamped 'em.


Then I added some lattice trim to all of the edges to clean it up and make it look like one, thick shelf.


I took the finished shelf out to the garage and sanded 'er down.  Knocked down the edges of the trim a bit because I generally don't like razor-sharp edges on things that I use daily.  I could not - for the life of me - get the tops and bottoms of the shelves to accept the stain.  I sanded and sanded, but the stain wouldn't take.  However, it occurred to me that only the bottoms would really be noticeable, so I gave them a couple coats for blending.  I got lazy and even left the top shelf white.  No one will ever see that shelf and if they do, I'll throw a cookie at their head.


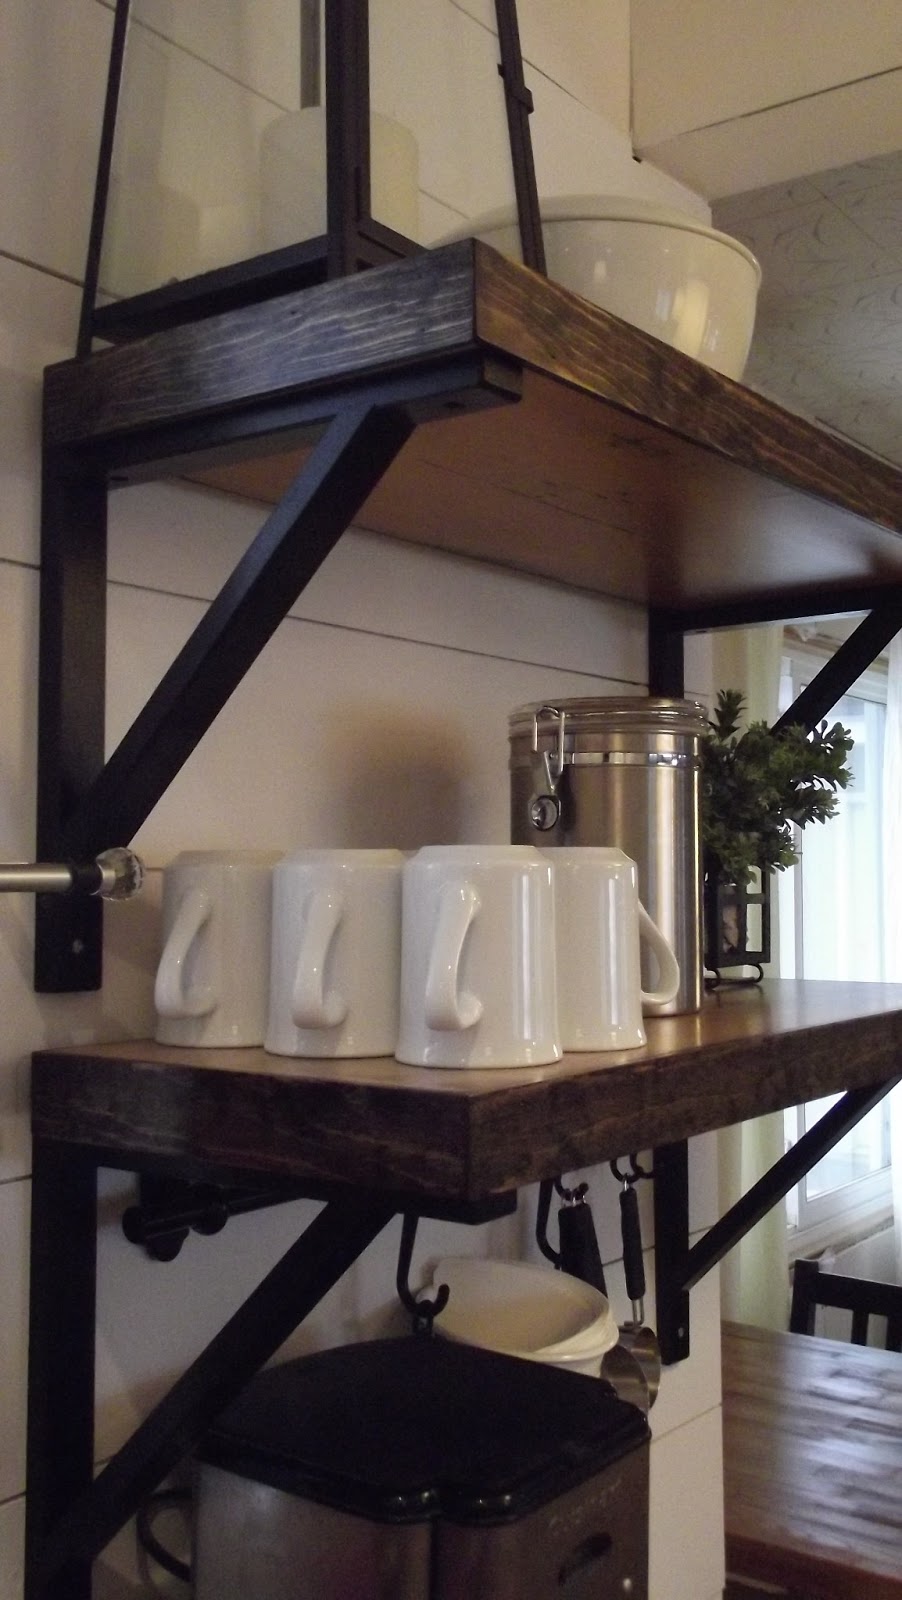
Here's the finished product (and yes, I planked the kitchen walls --- more on that later):


Top shelf is totally white.  Totally.

THEN!  I found this while I was searching the interwebz today:


Source: houzz.com via Carol on Pinterest


Those shelves are from West Elm and are $79.00 a piece.  I think my $9 shelves are more than sufficient for me.


Now that I have one spot that's somewhat manageable, the whole kitchen feels more like home.  And the itching is subsiding.

Linking up to:  Not JUST A Housewife, Coastal Charm

Thursday, February 28, 2013

Kitchen Eye Candy

I'm still illin', but the kitchen reno is creeping closer and closer and I can't stop thinking about it.  Wanna see some kitchens I like?  I know you do.....  Let's discuss.

First up is this beauty:


Source: decorpad.com via Carol on Pinterest


See that 'X' detail on the end of that pretty island?  I'll be doing something similar on the ends of both of my peninsulas.  I'm sure I'll get annoyed with the dust that collects in the deep, little grooves, but I'll take my chances.  I don't know how I feel about the hanging glass pendants or the light flooring.  I'm carrying the dark flooring from the rest of the house through the kitchen and need to keep that in mind when I'm choosing my counters and base cabinet color.

That's right base cabinet color.

I'm a sucker for darker base cabinets in the kitchen and one of the kitchens that I'm loving HARD is this one:


Can you believe that gorgeous grey on those cabinets?  The finish is unbelievable (check out her blog, she talks about the paint used when she had them sprayed) and the color really does blow my mind.  Again, light flooring, and I desperately want to know if my darker flooring would marry well with that amazing color without seeming too bottom-heavy.

I lovelovelove her kitchen, so let's take a look at a couple more views:


The silver handles look great with the darker tone and the subway tiles are such a cost-effective way to create a classically beautiful backdrop for the walls.

Now, since I'm all bananas about my dark floor, let's take a peek at what a dark floor does for a kitchen.


The darker floor really anchors the room and it seems like lighter cabinetry for the base cabs keeps the room feeling spacious.


With the photo above, the darker floors seem to blend in with the dark island, but the surrounding cabinetry stays light.  This definitely helps to expand the room around the center island.

I don't know.  Any thoughts on a dark floor with semi-dark lower cabinets?  I might have to do some test painting to see how the combination works.

I have a sniffly six-year-old waiting for me in the other room, so I'll leave you with this gorgeous backsplash image:


I know, right?  The unfinished trim/tile near the window is making my eye twitch a little but isn't the tile itself pretty?  I have the overwhelming urge to pet it.


Wednesday, February 27, 2013

A Little Bit Of Column A (Before and After)

It's like I'm having a contest with myself to see how long I can go without posting.

I win.

I'm dealing with a gross cold so this post is coming to you whilst inebriated with NyQuil.  Lots and lots of NyQuil.  I'm dead serious.  I've only gotten off of the couch about eight times today.  Most of which was to crawl about ten feet over to the landing in an effort to finish staining and poly-ing the stairs.

I'll try to make up for the last few weeks with one obnoxiously long post.  You're welcome.

One of the biggest and ugliest challenges with this whole-house reno has been the dreaded posts at the base of the stairs.


It's beautiful, right?  Don't you want one, too?  The scary-ish thing about these posts is that they're primarily responsible for keeping the second floor on the second floor.  It still boggles my mind that a handful of 2x4's can transfer that much weight.  Sure, there are other points within the house that help to transfer weight from the giant yellow LVL beams, but they're hidden and I don't see them every single day.

I knew I wanted to create stately, dramatic columns, but frankly, I've never really done it before.  I've played with moldings and trim to come up with some pretty profiles before, but this was new territory for me.  I pinned my heart out with images of columns and bases to get my brainz wrapped around how I was going to tackle them, but I was considerably freaked-out at this project and I let it sit.  Until just a couple weeks ago. That's almost five months.  Five months of yelling "Don't touch the posts!!! You'll get a splinter!!!" every time the boys hung onto them like a firepole.

Enough was enough and it was time to just dive the heck in.  But there was one step that needed to be completed before I could start:  I needed to address the landing issue and the lack of flooring on said landing.

We were originally planning on carpeting the stairs and landing but I nixed that idea mid-stream, leaving me with a REALLY rough starting point.  I didn't want to lay the floating flooring down that I was doing on the rest of the house because I thought it would clash with the steps going up and look ridiculous.  I thought about just painting the plywood and calling it a day ("You're a DAY!") but I knew that would look cheapo.  So, I came up with a plan to lay some faux painted plank flooring.  Although, I don't know if it's really faux.  It's wood.  It's cut in planks.  It's painted.  It's faux sho' on the floor.  So, technically, it's the real deal.  Right?

John ripped a sheet of 1/8th-inch plywood down to four-inch strips and I got to work gluing and nailing them down on the landing.


I used two dimes at either end for spacing because I wanted to keep a visible seam after I painted.  I also added a piece of 1x2 mdf on either side of the landing as a sort of bullnose to mimic the profile of the steps.


And then I got to painting.


I like the idea of possibly doing a decorative paint treatment on the landing, but the rustic charm of the plank floor looks pretty sweet as-is.

Back to the columns.  Did you forget about them?  Are you still with me?  ...tap, tap, tap....  Is this thing on?

Now that the landing had flooring, I could get started on those damn posts.  I started by sitting down and staring at them.  For a long, long time.  Then I dug through my mdf scraps and got to work putting together my column puzzle.


Creepy, blue tint courtesy of my awesome camera skillz


And in the almost-end, I have this:


I added a funky 'X' detail to the outsides of each column.
They'll tie in with another project I have in mind for the kitchen.


I still have a few bits of finish work to do before I call the landing complete:

  • Caulk, caulk, caulk and add a final coat of paint
  • Finish the risers for the bottom stairs
  • Add a coat of poly to the landing
  • Finish the trim for the outside of the landing
  • Change out the almond-colored receptacle for a white one
I'll do a 'final reveal' post soon with all of the finishing touches once I get over this stinkin' cold and muster the strength to get off of the couch and actually do the items on the above list.  For now, I'll just stare at all of the hard work that's finally behind me.

(Linking up to YHL's fantastically awesome 'Pinterest Challenge'!)

Friday, February 8, 2013

How To Keep From Falling Down A Staircase

The alternate title for this post could have been 'Building Another Bookcase', but where's the fun in that?

Let's start with the finished product and get it out of the way.


When we first added the second floor, I was totally all about a long row of pretty, white pickets and a monstrously beautiful newel post at the top of the stairs.  But then a couple things popped into my brains:  1. I have a pretty good fear of heights and I just didn't like seeing the drop all the way down to the first floor.  2. It wasn't particularly original or practical to do the picket thing.  The beauty of choosing to do all of the interior trim work ourselves means we can do whatever the heck we want (within building code, of course).

John wanted to do a regular half-wall, but he knew I wasn't going to be down with that.  It needed to be special and meaningful for our family and considering our massive book collection, the bookcase wall idea seemed like a total given.

We did this particular project quite a while ago, so my photos are pretty sparse, but I did manage to get a few.  We began with a safety hazard.


That's it.  Just a couple 2x10's nailed up.  Scary.  The boys weren't allowed to go up there without one of us, so I didn't have to worry about one of them taking a nose dive.

John then built some bases out of 2x4 lumber and screwed them into the floor.


And this is where the picture taking practically stopped.

Wop. Wop.

Just to give you an idea, we built the frame of the bookshelf and I made a counter-like top out of PureBond plywood, which sanded and stained beautifully.  I then put pine planks on the back of the unit and stained those, as well.


 Nevermind that side bit of trim, I was testing out ideas for finishing the sides.

The next step was building shelves and I did them exactly like the sunroom/family room unit.


Finished with a couple coats of paint and a whole whack of caulk.


And this is what she looks like right this very moment.

Taken at night.
With a camera phone.

Yes, I know, I spoil you.


Apparently, I kinda gave up on styling the bookcase once I got to the end.  Looks like I was just shoving books in there.  Which is probably exactly what I was doing.  I love all of the color and texture that it lends to an otherwise neutral hallway and yes, books are decorations to me.