Wednesday, July 10, 2013

Tiling Shower Walls - a.k.a.: Instant Gratification

John wants me to call this blog, 'The House That Clearance Built'.  Not sure why......  could have something to do with this:


Or this:


Or possibly this:


But today, it has to do with this:


Yes.  Those are 8x16" textured tiles marked down from $4.12 to $1.00.  One dollar!  I was home, struggling with our new paint sprayer (as it turns out, I am *not* the 'paint whisperer' like I thought I might be) and John brought the boys out on a routine trip to the hardware store.  About 5 minutes later, I got a call  from him saying something to the effect of "Get here.  Now.  You're gonna wanna see this."

Oh, and I DID want to see that.

We were ALL OVER the sparkly, white tiles and we did some math and figured out about how much tile would be needed to do the guest bathroom shower walls.  There weren't enough tiles available in the clearance bin.  <sad song here>  Interestingly enough, there were some charcoal-ish grey tiles that were marked down and so we played around with a few patterns right there in the store and decided to go for it.

I've never tiled a shower wall before so to say I was a teeny, tiny bit intimidated would be an understatement.  I gathered all of my supplies, took a deep breath, and just dove right in.

I lined the bathtub with some leftover cardboard.
Hey look!  There's a level!
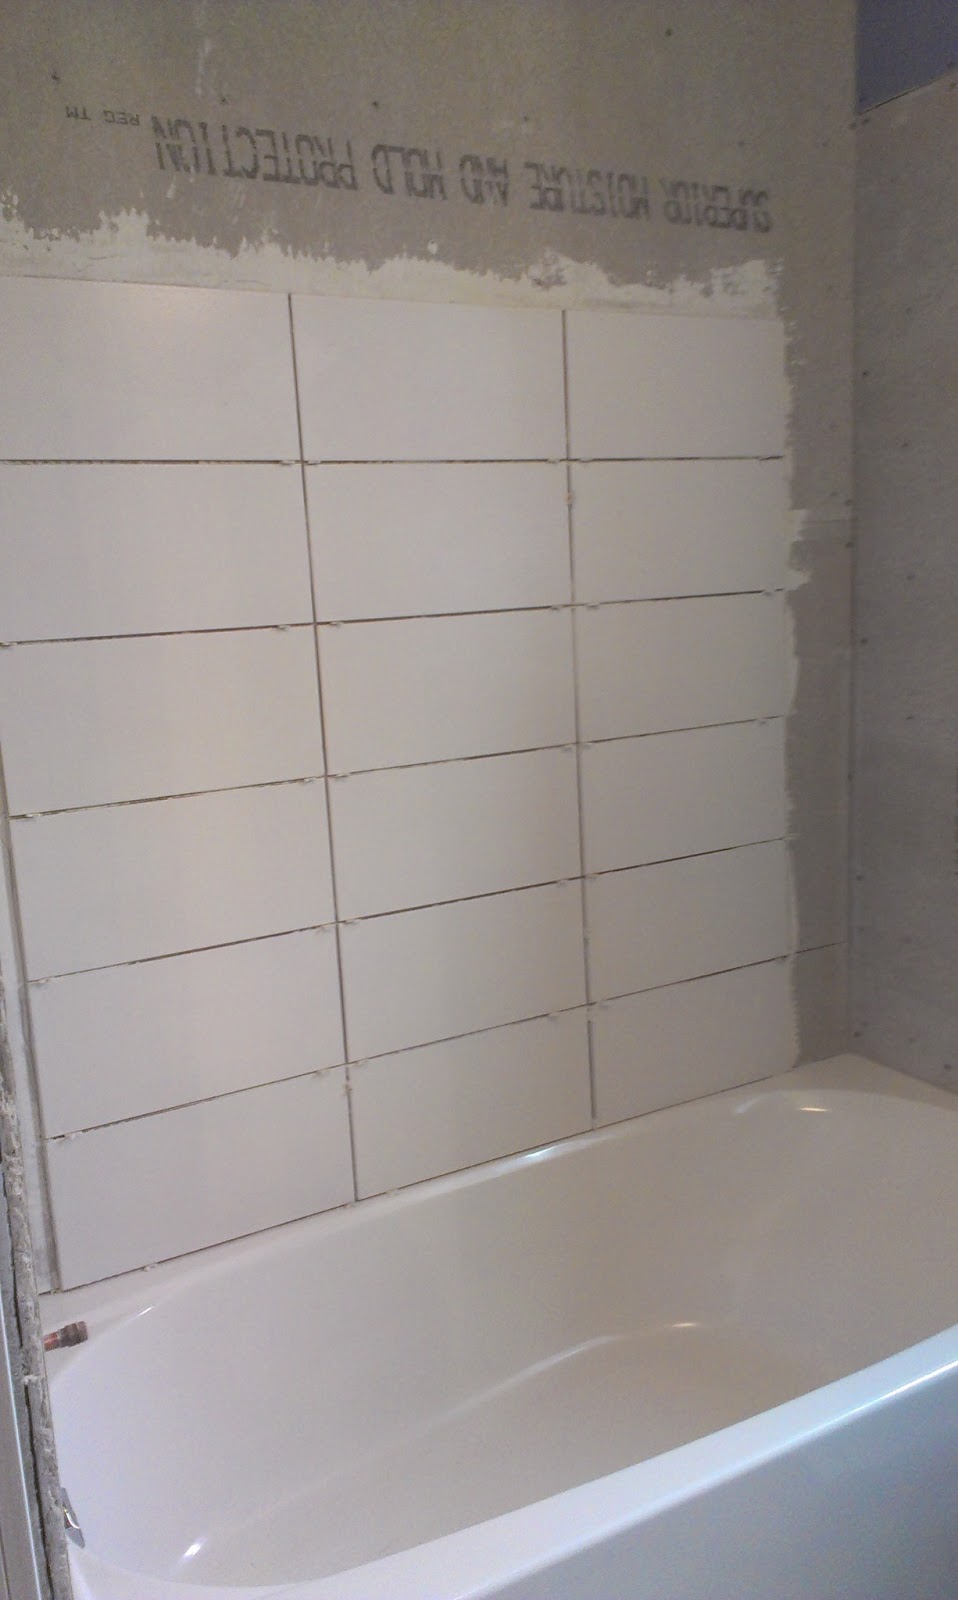
I start to get hives when things fall out of symmetry, so I marked my center line so I would know where to begin.  With white mortar, I mixed up a small batch to get started and spread a good layer of mortar onto the cement board with a notched trowel.  And proceeded to drop GIANT globs of thinset onto the cardboard-lined bathtub.

After a little while, I had this:


Talk about satisfaction.  I had been staring at that unfinished wall for a while and it felt so good to see it starting to take shape.  I let that first round of tiling set up for a while before I started on a grey band and the side walls.  Also, I ran out of white mortar and continued with grey mortar.  I figured that if I kept my joints somewhat clear, I wouldn't have too much of an issue with it coming through my white grout.


The corners required a quick snip on the tile cutter and for. the. love. of. pete. I kept chipping the edges of all of my cuts.  No matter what technique/method/wishful thinking I tried, the edges were chipping.  And I was quickly using up all of my 'just in case' tiles.  I ended up just taking the ones that were the least hacked up and using them - with the hopes that grout might help to cover up my sins.


Speaking of sins.

Remember how I said that I didn't think using the grey mortar would be that big of a deal?

It was a big deal.

I am neither neat, nor careful when it comes to mortar.  When I came back the next day, I had grey mortar crustily oozing out errwhere.  It was not in the least bit attractive.  And neither was the sight of me frantically trying to scrape out the surprisingly (?) cement-like bulges from all of my seams.  It was brutal.  And this was the best I could muster:


I was really and truly hoping that the grout gods would be forgiving and help me out with concealing this travesty forever and ever.  Amen.

They totally delivered.

This is just after applying the grout, hence the haze.
I have to say, I thought grouting would be way more fun.  It was stressful to me.  I was really concerned about the coverage and I suppose standing on the sides of the tub and reaching up as high as I could - overhead - didn't make it any more pleasurable.  I found that my hands were shaking and achy at the beginning, so I got some awesome (and handsome) assistance.


John jumped in and started grouting like a boss and I was able to follow from behind and make it pretty and uniform.  In the end, I'm pretty pleased with the result.


The finishing touch for this particular job was to add a bead of silicone to the perimeter of the tub where it meets the tile.  I had read that a good tip is to fill your bathtub prior to applying the silicone so that if there's any flex when the tub is full, you'll reduce any cracking or displacement of the silicone.

I placed a piece of scrap tile behind the running water to prevent any splashin' onto my pre-siliconed area.
A little bit of painter's tape and a nice, thick bead of silicone.


Remove the tape while the silicone is still wet and while the tub is still full and let that puppy sit for a while.


Once things are nice and set, drain the water and marvel at the awesomeness of it all.  I followed up a week later with some sealer and BOOM.


This is as clean as this bathtub will ever be.  Ever.

Saturday, May 11, 2013

To Tank Or Not To Tank.

(via)


A few months ago, Houzz.com featured an incredibly informative article geared toward people undergoing a whole-house remodel/renovation.  Some fantastic points were brought up, but there was one tip in particular about tankless water heaters that got me 'heated' up.  (How could I *not* go there?)

I'm embedding the article here because it was pretty sweet and it might help someone else in a similar situation.


Now..... on to the reason for this post.  Without a lot of research beforehand, we purchased a tankless water heater when we updated the furnace and air conditioning.  We were almost doubling our square footage and according to the HVAC peeps, we would need to upgrade our (already very old) units in order to pass the HVAC inspection and be up to code (I have my reservations on some of this information.  Do your research beforehand to be 100% sure).  Long story short: we thought that going with a tankless water heater, as opposed to our regular ol' run-of-the-mill tank water heater would be the fancy, dee-luxe apartment in the sky right thing to do.


Well.  Notsomuch.

Here's the edited and prettified version of my comments from the Houzz article.  Maybe they'll be informative for someone out there on the fence with whether or not to take the tankless plunge.

*****

"With regards to your first point ('Consider Water') I would *HIGHLY* suggest people do their homework on tankless water heaters. I chose a tankless heater based on all of the glowingawesomewonderfulunicorns! reviews I heard and I gotta say, I hate it. With a fervent passion. Like, I want to punch it. 

"Consider a separate tankless or tank heater for your second story, or a larger tank with a recirculation pump that keeps hot water right at your taps." 

Girl, word up to your mutha. 

In hindsight, I would have factored in a recirculation pump to my overall budget. But I didn't. So, for the time being, I deal with excessively cold water for excessively long periods while the tankless unit debates whether I deserve to wash my hands in warm water.

With regards to people saying that they're "much more" economical than the gas ones, I don't know how true that is. I think that in the long run, yes, you might save some money, but that's at the cost of: 

-your dishwasher not running properly due to the lack of immediate hot water 

-your laundry potentially not being cleaned properly. With two little boys at home, I have some MAJOR loads that need to be washed in HOT water. With high-efficiency washing machines that don't use much water to begin with, they certainly aren't getting up to temp to clean certain loads the way I'd like 

-unbelievable water waste. I used to turn on my shower and be able to hop in and adjust temp within about 5-10 seconds of having the water run down the drain. Now, whether I'm showering or washing a dish or my hands or whatever, I have to wait upwards of 20-30 seconds. Sometimes more. That might not seem like much, but it's *amazing* how much water is actually being wasted during that time 

-the dreaded 'cold-water sandwich' as my trades call it. You turn on the hot water in the kitchen to wash a few dishes. You then turn the tap down or off for just a moment to grab those dirty pots on the stove. You turn the tap back on to hot to continue washing and you're met with another round of ice-cold water while you wait for the unit to kick back on. I've heard that this is because some (all?) units require a certain flow capacity to be running consistently in order for the water to be heated. Again, wasted water while you wait for the hot stuff. 

Yes, you can purchase recirculation units and have them installed so that they're a fresh supply of hot water at a moment's notice. Yes, you can even purchase a holding tank that keeps a batch of hot water waiting for your beckoning. But you know what? If your tankless water heater requires a tank for it to be effective, why bother? 

For me, personally, it hasn't been worth it. AT ALL. I don't feel that my saleperson that touted this unit did an adequate job of disclosing the above-mentioned issues and frankly, *I* didn't do a good job of doing my homework prior to spending an arm, leg and torso. 

***This is information taken directly from a company's website that sells the recirculation pumps http://us.grundfos.com/products/find-product/comfort-pumps-up-10.html: 

*"Significant water (and sewer) disposal savings, retaining the 12,000 to 38,000 gallons of water a typical U.S. home wastes annually waiting for hot water. Some fast-growing counties are making the installation of hot water recirculation pumps mandatory for all new construction projects."* 

Guys, that's *typical* US homeowner. Does a *typical* homeowner have a tankless water heater? Probably not. If the typical Joe Schmoe is wasting upwards of 38,000 gallons a year with a regular hot water tank, it makes me shudder to think what I'm wasting. If all of this information is true, it should come MANDATORY. Period. New construction or not. 

If I had to do it again, I'd buy a bigger heater and wrap that sucker in insulation."


Do you have a tankless water heater?  Are you considering it?


Friday, May 10, 2013

And Then There Was One

This post is brought to you by the man of the house, John.  
Let's give him a warm, Elephant Buffet welcome!  


With a deathly level of seriousness, Carol tells me she has something to confess. 

"I did something stupid today, and it's been killing me trying to figure out how to tell you," she says.  She takes a deep breath, "I drywalled your levels into the bulkheads above the cabinet today."

I laugh, relieved it's something so small, but then a little detail nags my attention.  "Wait.  My lev-ELS?" I ask.  "Not just my level?"

"No," she replies, "There's two of them up there.  But not your good one.  That's still in the garage."

I let it sink in; my trio of levels had turned into a solo act with one stroke of a putty knife.  And though my "good one" was more expensive, it wouldn't have won the Sophie's choice of levels, had that scenario ever been raised.  A little voice tells me to look on the bright side.  It could be worse.  All three of my levels could be stuck above the cabinet, forever silently ensuring the alignment of that one wall.

I look up at the bulkhead, considering the necessary search-and-rescue.  Nothing short of a hole in the drywall would do.  And after all her work, I'm just not prepared to ask Carol for that.

So.  There is not one, but two levels up in the bulkhead above the cabinets.  Adding to the stories which makes the house a little more "ours".    

Saturday, March 30, 2013

What Goes Up, Must Fall Down (DIY Stair Runner)

The stairs.

Those things are the bane of my existence, I tell ya.  It's been like putting lipstick on a pig.  And not fancy MAC lipstick, either.  More like iridescent, pink Wet N' Wild that's been sitting in a makeup drawer for thirteen years. 

It's been bad.

But lately, I've run into a non-cosmetic issue with those darn things.  The kids keep falling down 'em.
I asked Jack to re-enact his latest tumble:


He was all too happy to demonstrate.  Love that kid.

I've been fighting putting carpet on the stairs since we got them.  I've been convinced I could refinish them and make them awesome.  It's not working.  They look bad.  Real bad.  There are gaps everywhere and cracks in them.  And apparently, they're slippery.  I only put two coats of satin polycrylic on them after I stained them with the hopes that they wouldn't be too slick.  And they're not really all that slick, but for a 4 and 6-year-old wearing socks while chasing each other down the stairs, they spell D-A-N-G-E-R, Will Robinson.

So, I got to work.

I saw this runner makeover over at Little Green Notebook and used it as my inspiration.  I love the lines and color of this little rug from Ikea:

Ikea 'Soften' rug


I picked up four rugs during a recent trip to Ikea and jumped right in.

That wayward staple was removed.  Don't you worry.

I worked my way down, doing my best to stretch the carpet around the edge of the tread and staple it just underneath.  I found that if I stapled it on the white stripe, it was nearly invisible.

Don't do this.

Do this instead.

And at the end of the day, I was left with this:


Crazy, right?  Let's take a moment and go back in time (a few months ago) and look at what I started with:


And with the magic of the internets, I have this:

I took this photo while I was waiting for the paint to dry on the trim piece
 I placed at the bottom of the stairs to cover the end of the stair runner.


I especially love how the stripes look from this angle:


I still need to finish the trim paint on the faux stair skirt, and add a couple bits of trim, but those stairs have sure come a long way, baby.  I have no idea how the carpeting is going to wear.  And seriously, what was I thinking putting dark, charcoal fabric on stairs while we're still under construction?  They show every speck of dust.  But I'm still very, very happy with the end result.  I'll report back over the next few months and throw out an update.

Linking up to:


TDC Before and After

Monday, March 18, 2013

Thirty Minutes And Nine Bucks - Open Shelving Tutorial

Thirty minutes and nine dollars.  That's it.  That's all you need to build some functional open storage for your kitchen.  And probably to get a questionable massage in a questionable neighborhood.  But let's talk about shelves today.

We've officially opened up a can of whoop-ass on the kitchen and I'm not taking any prisoners.  My goal is high-end looks on a low, low, low, low budget.  In order to achieve that, I'm planning to DIY the ENTIRE thing.  I'm reducing, reusing and recycling, baby.  And that brings us to today's project, which has me particularly excited.


A little backstory for you:  We started this whole-house reno last August.  One of the first things that had to happen was gutting the pantry since that was going to be where the staircase went.  I still remember the morning that the builder told me I was going to have to clear it out.  I think I knew at that moment that things were going to get real up in here.


And then we tore the wall of cabinetry down in order to expand the kitchen.  So, everything in those cabinets got relegated to the basement, along with the contents of the pantry.


I spend about 85% of my time in the house in the kitchen on any given day.  From making coffee first thing in the morning, prepping lunches for everyone, fixing after-school snacks, all the way to making dinner and cleaning up the ridiculous messes that happen in here.

I love being in the kitchen.

I love cooking.

I even love cleaning it.

 I've been without a fully functional kitchen for about EIGHT months.  Eight months of feeling sad every time I came into the kitchen to prepare a meal.  Eight months of barking at the kids to not touch certain boxes of construction-related material that were all over the place.  Eight months of not being able to find the things I need because I seriously had no idea where they had been packed.  EIGHT MONTHS.  That translates to about 240 days.  Two hundred forty days of feeling lost in this house.  

Now, I know it sounds dramatic and granted, I wasn't going to fling myself off of the Ambassador Bridge or anything.  But I'm willing to bet that anyone who has ever gone through a big renovation like this can relate.  Heck, even people who've only done their kitchens will tell you how horrible it was.  But the last 240 days in this kitchen.... they've been.... not awesome.

And every single one of those days, I thought about how I was going to make this kitchen awesome.  I've collected so many clippings of kitchens and one thing that has always stood out was a touch of open storage.  Just a touch.  Not too much.  I don't like visible clutter (It makes me itch.  Ask John) and if I was going to go the shelf route, it needed to be neat and tidy.

And cheap.

Let's get started, shall we?

I began by scooping up four of these lovely lads:


Source: ikea.com via Carol on Pinterest


Then, I found a few cabinet doors from the demolition phase of the kitchen and asked John, very nicely, if he would rip them down to a shelf-ish dimension of about 26"x10".


The boards were in super-pretty shape.  Super-pretty.


I simply glued the boards together and clamped 'em.


Then I added some lattice trim to all of the edges to clean it up and make it look like one, thick shelf.


I took the finished shelf out to the garage and sanded 'er down.  Knocked down the edges of the trim a bit because I generally don't like razor-sharp edges on things that I use daily.  I could not - for the life of me - get the tops and bottoms of the shelves to accept the stain.  I sanded and sanded, but the stain wouldn't take.  However, it occurred to me that only the bottoms would really be noticeable, so I gave them a couple coats for blending.  I got lazy and even left the top shelf white.  No one will ever see that shelf and if they do, I'll throw a cookie at their head.


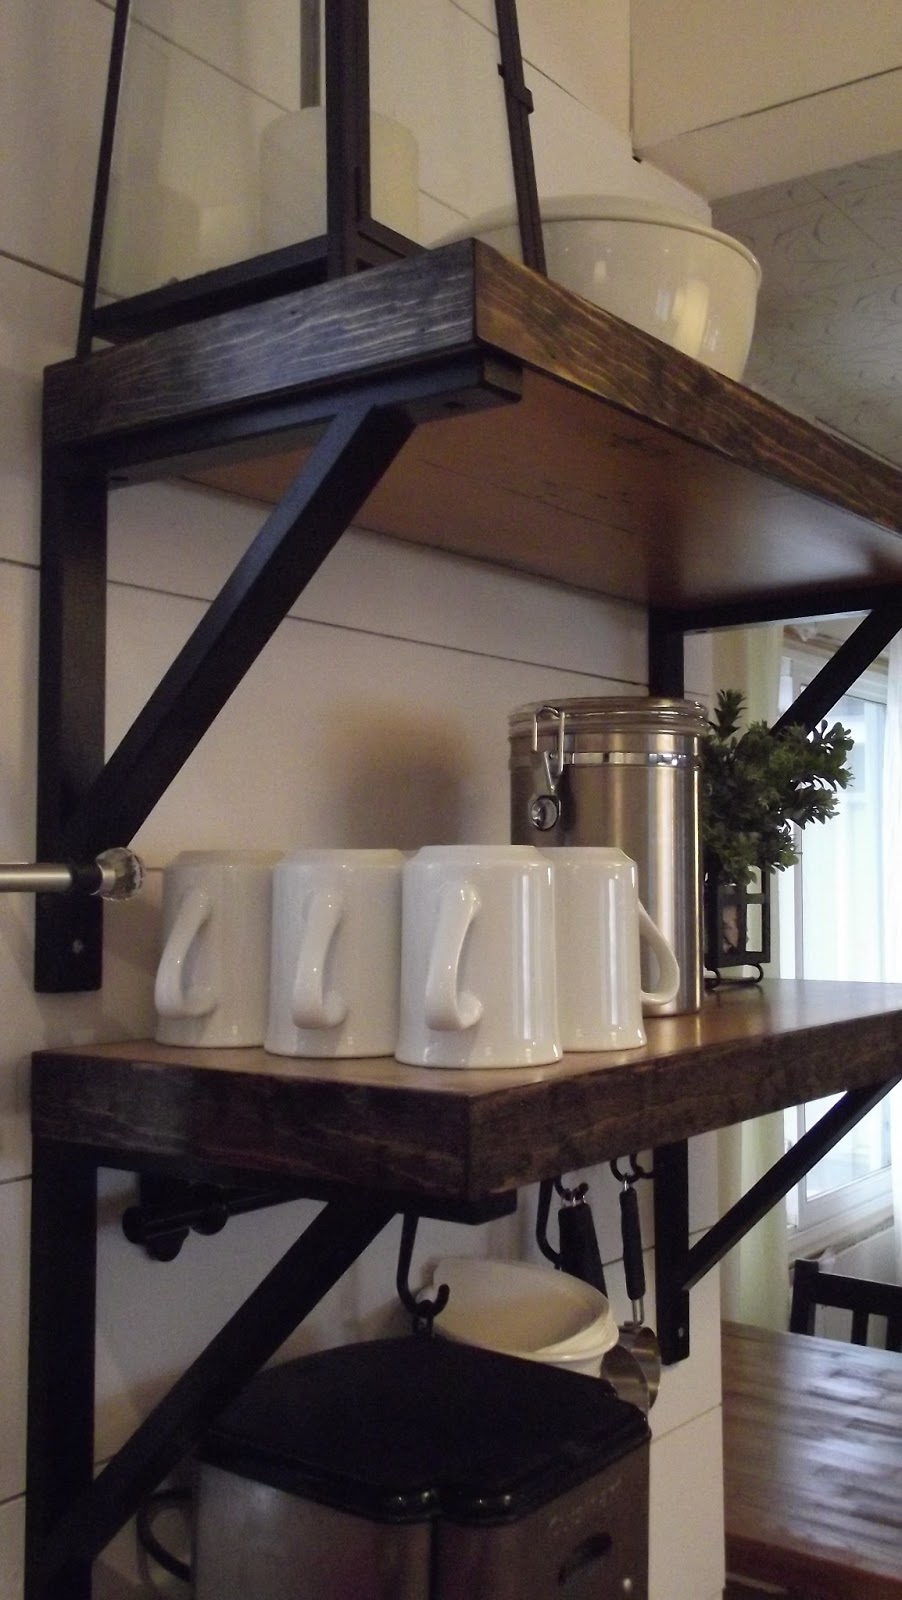
Here's the finished product (and yes, I planked the kitchen walls --- more on that later):


Top shelf is totally white.  Totally.

THEN!  I found this while I was searching the interwebz today:


Source: houzz.com via Carol on Pinterest


Those shelves are from West Elm and are $79.00 a piece.  I think my $9 shelves are more than sufficient for me.


Now that I have one spot that's somewhat manageable, the whole kitchen feels more like home.  And the itching is subsiding.

Linking up to:  Not JUST A Housewife, Coastal Charm